Showing posts with label easy projects. Show all posts

Thursday, 15 January 2009

cute project: customised book covers


Penguin Classics had a huge success with its orange, black and white covers this year. (They even let you design your own cover. How very cool.) But wouldn't you rather see the classics looking like this? Image via The Names Agency

This idea is possibly only for people with lots and lots of time on their hands, but I do love it so. I have a thing about paperback books. Of course I buy them because you're not exactly going to get The Devil Wears Prada in a hard cover coffee-table style are you? But I don't like how they look: all weird colours and slightly different sizes and widths. Brown craft paper is a popular recovering option, but I love this one the most. If I had a spare three years to recover each and every novel, travel guide and dictionary with pretty paper and uniformed custom-made book labels, I so would.

Even though it's a highly impractical idea for your entire book collection (unless yours is, like, seven), it would work well to hide the really butt-ugly spines or hardcover books you'd like to use to bulk up your coffe-table display but just aren't pretty enough. Or just with a small collection you'd like to pop on a display shelf or buffet top.

But I could especially see it working as a gift. Say you bought your sister all of Candace Bushnell or Jodi Picoult's books as a collection - how much would she love unwrapping it and seeing the books looking like this? The hardest part would be getting the spine labels the right widths, but you could always cheat and do it the other way, in which case you'd have more room to work with. Oh and did I mention it'd be a GREAT thing to do with leftover wallpaper? Because it would. And I don't often mention wallpaper, do I??? Ha!

Monday, 12 January 2009

this week why don't you...

...read this...


My latest blog obsession is Inchmark by a former Martha Stewart Weddings and Kids graphic designer. Everything is beautiful, the ideas are unique and you can tell special thought and love go into everything she creates. If there is such a thing as a blogger crush, Brooke Reynolds is mine at the moment! I'm going to steal this idea (above) to make door plaques for my kids' room.

...download this...


It's fab! It's funny! It's free! The ever-popular Stay Calm and Carry On poster has been spoofed and shrunk into a greeting card. Download it here from Creature Comforts and print onto card. Or you could probably even print out on A4 size card and frame as normal.

...cook this...


Make these yummy blueberry muffins now in time for your 4pm sugar hit. And if you do all that mixing by hand, the exercise will cancel out the bad stuff you consume!

...try this...


This pretty light started out as an odd little froggie lamp from Ikea's children section, can you believe it? Nicole from Making it Lovely shows you here how to glam it up easily. Oh look! Another use for wallpaper. Is there anything it can't do?

...enter this...


Blog in desperate need of someone to wave their magic wand over it? Leave a comment on this post at Oh Brooke and you could be lucky enough to win a blog redesign by the author/clever creative designer. You have until today (Monday, Jan 12) but luckily, we're ahead of the States, so even if you don't read this until Tuesday morning, it'll still be Monday over there! Tricky! Great blog too with all sorts of handy decorating tips and tricks.

Friday, 5 December 2008

Get a gripp(iks) of this!


No messy wallpaper paste! Dress up the back of a bookshelf and sides of magazine files...

Like a good quarter or so of the world's population, you have an Ikea Expedit cubed storage system, a Lack coffee table, a Billy bookcase or a Malm chest of drawers. Right? Now, while Ikea Hacker blog has some fabulous customisable ideas, you just don't have the time, energy or creative ability to personalise your own. Correct? But you'd like to give it a teeny tiny bit of pattern or colour or both. Yes? Well then, if you can peel and stick, you can give your Ikea pieces a new look. Independent Australian company Grippiks Surface Accents (not related to the Ikea group, by the way, just huge fans!) sell patterned films pre-cut to fit a range of Ikea's most popular pieces (such as the above). Unlike decals, these stick to a surface through suction, not glue, so there are no bubbles, but they can still be repositioned and removed easily. And if you likey, they're available to buy online only and ship worldwide. Here are some more ideas...


...or the front of a dresser...


...or your bedside table drawers...


...or the storage boxes in your Expedit...


...or the tops of your tables. All images from Grippiks

Thursday, 4 December 2008

paula's "made it myself" advent calendar


Paula's version of Lisa Tilse's advent calendar

After posting about Lisa Tilse's clever advent calendar tutorial, I was all set to do it myself. Until a thing called time was robbed from me by work, renovations, babies and life in general. But I was happy to see someone had given it a go - a reader, Paula, emailed me a pic of her completed calendar and she's done such a great job, I had to share. And guess what? It even fits with my Ikea theme - she used Ikea paper! She says the cones are filled with little packets of sultanas which are a hit with her son. Snaps for Paula - it looks great!


Maybe I'll have more time to try it next year. This year, though, we used a rather large Santa Claus face my mother bought for Zak's first Christmas with little pockets in his beard. Considering he was a month old for his first one, and just one at his second, it hadn't got much real use. This year, though, Zak searches for the right number and is delighted with his "yummy yummy snaaake". So not quite as stylish as Lisa and Paula's, but super-excitment for him (and us, of course!). Except I've had to pop all the treats in the fridge and place in the appropriate numbered pocket minutes before he does it because ALL day he pulls on the beard and repeatedly yells out the next number, hoping I'll let him do it because he knows what to expect now. Little bugger!


The latest crafty project from The Red Thread's Lisa Tilse

Oh, and on the subject of Lisa: she's also created this beautiful Chrissy wreath too! You can check out the tutorial right here

Thursday, 27 November 2008

twinkle twinkle little lights


Love is... this pretty sparkling fairy-light canvas. Sure beats a lamp! Image from Apartment Therapy

I was happy to see my paper-covered plywood letter included on One Pretty Thing the other day. But I was even more excited to see this amazingly beautiful lightscape. Fairy lights (or, for Trina, Christmas lights!) have become popular away from the Chrissy tree, entertainment deck and the Griswald family's house exterior. They're often pinned to the wall in a tree-like pattern, hung over vanities or mirrors or wrapped around stair railings. But I love this the most: basically, little holes have been made in an art canvas in a pretty pattern with the little light bulbs pushed through. I imagine the back of the canvas is one huge mess, but the front is divine. How AWESOME would this look hung from the ceiling in a kids room? You can find the instructions here.


But this is just one pretty thing on One Pretty Thing and if you haven't discovered it yet, set aside a few hours because you'll be there for a while: it's crammed full of great projects, tutorials and freebies around the world wide web. Your to-do list will never be blank again!

Wednesday, 19 November 2008

2 easy projects


A stylish way to count the sleeps until Christmas. Pic from The Red Thread blog

1. DIY advent calendar
For as long as I can remember, Christmas was always counted down in our place with an advent calendar. We had a really cute one from Germany for years that didn't have treats in it, but tiny little toys you put on display in the appropriate window. This was our favourite. Until the chocolate ones came along. I've noticed they're not the most attractive things, though, are they? So I was happy to see this little project last week by Lisa Tilse, the clever artist behind the The Red Thread. She'd been winging it and writing about it as she went, and I noticed this morning she'd finished. Isn't it beautiful? She swears it's not that hard to do, so I want to give it a go as soon as this deadline is out of the way (it always seems like I'm on deadline, doesn't it? Was a very short month this time, new issue out Monday). You can find out what you need and how to do it right here.


Book-page envelopes. Sooo easy.


2. Storybook envelopes
The end result is in the Chrissy issue of Real Living, but here is a little how-to. If you have children and if they're anything like my son, you'll know that there's only so many times you can stickytape a ripped-out page back into a book before it falls apart completely.


You'll need: a book page (or photocopied page, gift wrap, scrapbooking paper etc), scissors, glue and an old envelope

So if you have random pages lying around the house or books beyond repair, put them to good use: turn them into an envelope and mail them off to the grandparents with a little note inside from their favourite little person.


Step 1: Open up a used envelope (it's all about recycling) so it's completely unfolded and lay on top of the page (or photocopied page) you want to use.


Step 2: Cut around the envelope shape.


Step 3: Fold all the flaps so it's an envelope shape. Glue the two side flaps, fold the bottom up and stick in place. Fill with goodies and glue the top flap down to seal.

Chances are, there won't be much room on the front for writing an address, so to ensure it's clear for the postie to deliver, pop on a sticky label or glue on a piece of plain white paper for the address label.

Tuesday, 28 October 2008

Room with a (fake) view


Image from VT Wonen

Here's a new way to dress up a boring wall. Wallpaper of COURSE features, but I really mean this very cool fake window picture. Cute, huh? I especially love the casualness of it pegged to a floating branch with bulldog clips, although I have no doubt this "casual" look was a rather well-thought out plan and not as easy as it looks to put together. A bit like all the make-up you use to get the "natural look!" A great idea if you'd like more windows or a cheeky window covering!

Wednesday, 22 October 2008

Inspired Wednesday: wallpapered buffet


The wire bowl of wool is a cute decor idea for the crafty kids. Image from Elle Interior

My name is Belinda and I'm a wallpaper addict (which is rather odd considering the only wallpaper in my house is on a chest of drawers, in a picture frame and covering a canvas - not actually on a wall). It's been five days since my last post on the subject, but this was too pretty to not share. If you couldn't handle Cole & Son's Cow Parsley on a whole wall, why not do it on the cupboard doors of a buffet? Great idea for a less-than-glamourous second-hand one. Right, back to work for me. x

Monday, 20 October 2008

one more post on clever template people


Free paper flower tutorial (looks sooo simple and how beautiful is this pic?) from Dozi

Yes, I've become a little obsessed with the people behind Little Brown Pen. But it's their own fault - they've got so many great blogs between them and I've spent way too much time browsing through them and getting so many great ideas. Little Brown Pen has sooo many pretty things and Amala is perfect for my new love for all things natural, green and organic. Both have also led me to many more brilliant Etsy sellers which you'll prob hear more of soon enough. And - the reason you'll love them too - Templettes is all about the best of the best templates available on the web. Want a greeting card, business-card envelope, cheap art or apron pattern? They'll show you where to get them for next to nothing and for nothing. This is the best category: freebies! Here are a few things you can download for free, or next to it, that Templettes have discovered for you. Enjoy!

Love this "Easy Peasy Lemon Squeezy" eye-chart print. From Poppytalk


Beautiful tree card from How About Orange


Cool chore chart by Little Brown Pen

and another top idea: fog and thistle's papercut templates


Made him myself. Well, not this one, but I hope mine will look this good! DIY Papercut bunny, $US2

I really need to stop with all the Etsyness or I'll go broke. Slowly though - like a few dollars at a time - as everything is priced so well, but still broke!
You've probably seen the beautiful papercut artworks by Fog and Thistle's Rachel Weber (ooh, Weber was my maiden name!) around the blogs, but did you know she's generously offering mini papercut templates for sale on her blog so you can DIY? After considering whether to buy for a whole 100th of a second, I pressed buy now for this little cutie (above) who promptly arrived in my inbox seemingly moments later. It might stay there for a little while as I'm hideously busy attempting too many other things, but I hope to get him all cut out and sitting prettily on a wall or shelf somewhere soon - stay tuned!


Not a DIY one, but one of Rachel's beautiful works, US110

I love the fact Rachel has combined her passion for papercutting with other people's passion for DIY - it's a lovely way to share what you do and is a brilliant combination. Plus, for $2, even if you're completely useless at the cutting out part, you could always print it out again and colour it in instead to create a cute little artwork, couldn't you?


Another cute DIY kit, $US2

Thanks Rachel for allowing a little of your cleverness to rub off on us less creative folk! Check out the template range plus more intricate papercut art for sale by Rachel at her Etsy shop, more printable stationery by her at her other store, Along the Dotted Line and her blog.

Friday, 10 October 2008

have a relaxing weekend


This random collection of fabrics (and some are rather hideous!) works beautifully as a patchwork. And is somehow glamourous in this setting. Love it. Picture from Getty Images

Am leaving you with my fave pic of the week. I love it all and it makes me wish I still had the clawfoot bath we left at our old place. If we still lived there or ever moved back (but we won't, cause it's on the market at the moment!) I'd do just this: hang a beautiful patchwork curtain from the ceiling instead of a shower-curtain rail for full dramatic effect, with a cheapie plastic one on the inside of it for practical reasons. And how cute is the flower heart on the wall? Sweet! It's inspired me: am off to sink in my not-so-glam-but-still-relaxing bath right now! x

Wednesday, 8 October 2008

DIY destination posters


Customisable destination bus scroll stencil, $240, Stencil Gallery

You just know something is a trend when a cheaper version of it pops up somewhere. In design we have replica furniture, in fashion there are designer rip-offs in chainstores within seemingly minutes of it walking down the runway. In the art world, if there isn't a print of it, there's probably a wall decal or stencil version! I found this destination bus scroll while doing some freelance work. It's a stencil, but it's a pretty good one I think. Just spray the back lightly with a temporary spray glue, press onto the wall and spray with an aerosol paint for the easiest version (maybe cover the vicinity in newspaper to avoid accidental graffiti). Good old Stencil Gallery does it again! What's even better about this one is - and that you just can't get from real vintage ones - is that you can customise it: you get to choose the 13 lines of destinations you want. So whether it's your surrounding suburbs, places you desperately want to see or a memorable world-wide trip, you're the bus driver! The stencil measures 150cm high x 75cm wide and is $240. Grab it here.

Friday, 12 September 2008

Did you know...?


Amy's signature style, only smaller

Amy Butler has a new book out - for the bubbies. Little Stitches for Little Ones helps you style up your baby's nursery, wardrobe and life. Love the nappy bag and playmat. More pics here


Some of the projects: toys, quilts, clothes. Pic from Amazon

Thursday, 11 September 2008

new towels + new project


My new towels from Le Souk

For all my sob story about never being able to buy from great shops overseas, there is one you need to know about if you don't already: Le Souk. This beautiful collection of homewares is owned by Danielle from the Style Files and... drumroll please... ships worldwide! Which is good news if you fall in love with these towels like I did. Aren't they beautiful? Turkish, tasseled and terrific - I love the woven pattern and the softness. All up the two cost a little over $AUS100 to get here (good old international shipping!), but that's no different really to buying two good bath towels at David Jones is it? And plus, I'll do anything for love...

Last night I left my laptop closed and had a bath. Ok, I send off some emails and then closed it (it's really, really hard to not log on once the babies have gone to bed and have a little browse around). It was rather heavenly. I was so relaxed I decided to start a little project: a completely embellished cushion. By hand.


Time consuming, tedious and yet oddly relaxing: the start of something fabulous. Potentially fabulous.

Several years ago I did this to the top of a white singlet and loved it so much I only just parted with it recently to bin because it was no longer white and, in parts, no longer beaded. It took me a whole long weekend. Considering I had no children then and absolutely nothing else to do over those three days, I estimate it will take me until sometime in 2010 to finish this one! But, oddly enough, I find the tediousness of stitching on teeny tiny beads and sequins quite relaxing (except for when I jab my finger. Which is quite often.) My plan is for a rectangle-sized cushion with a smaller rectangle on the front completely embellished. Although seeing as it took me just under half an hour to do this much last night, it just might soon become a square (shorter amount of time!) We'll see...

Monday, 8 September 2008

cute and easy idea


Draw your way to priceless heirlooms. Pics from Lille Lykke

And you thought plain, white modern wardrobes were boring! I've heard of wallpapering them, decal-ing them, covering them in photos and of course painting to jazz them up, but this takes the cake: a whimsical antique princessey armoir drawn on the doors. As odd as this sounds, to look at it, you really only notice the outline. Simple, clever, stylish!


La la lovely

Great idea for a girlie bedroom without the antique price tag, but perfect for little princesses!

Monday, 1 September 2008

magazine storage at its finest


Do you think this homeowner likes to read? Pictures from Taverne Agency

If you're anything like me, you have too many magazines than you have shelves, cupboards and racks in which to store them. I have the newest real livings and dominos on a shelf above my desk, a pile of my favourites under my desk growing dangerously close to the desk-top underside, while in my spare room the four-year's worth of Cosmo issues I worked on are in a cane basket, I have paper folders bursting from old issues of home mags, Madisons and Shop Til You Drop are strewn over the floor (I'm not very tidy) in front of a couple of other piles of new and ancient publications I just can't part with for whatever reason. And this is AFTER I half-filled a yellow recycle bin after a clean out. One day I will find a solution. Or have a house big enough to dedicate a room to a magazine library (and newspapers - my husband edits a weekly paper, so we have piles and piles and boxes and more piles of newspapers too. quite the fire hazard really. grr), but until then...


Creating a bit of a pattern by stacking them horiztonally and vertically ensures it's not just a stack of magazines! Pretty things on top seal the deal.

If I didn't have children, I'd so do this: create magazine storage using magazines - stylishly. This homeowner has neatly stacked a rather large amount of mags to form a console table. A piece of glass cut to size rests on top, creating a nice little station for pretty things. Perfect if you can't bear to part with your faves, but don't flip through them on a daily basis as unstacking and restacking regularly couldn't be too much fun. But it looks like she's got that covered: another two easily-accessible piles are on display under the clear coffee table.
I find it a great idea and love that it's an instance in which magazines physically help create a stylish room, not just tell us how with words and pictures. So, how do you store your mags? I'll be moving office space at home soon and would love to hear some more ideas.
x

Thursday, 28 August 2008

fine and dandididliandi (that's in Flanders' voice for non-Simpsons fans!)


"Dandigami" Lotus flower paper napkins. Download free instructions here

Even though I missed the Stitches and Craft show last week, I'm happy to say I didn't completely miss out on what I wanted to see: the Dandi stall. The lovely Caroline from Dandi contacted me to fill me in and show me what they got up to: demonstrating how to make this cute napkin origami - perfect for your next dinner party. The good news is, Dandi has a blog (fineanddandi.blogspot.com) and has posted the instructions on it for anyone to download - for free!


So-pretty fabric mobiles to dress up your home. You can buy the kits to DIY

And even better news, is the gorgeous little project kits they were selling at the show will soon be available on their online store (but for now, if you want one, best to phone or email them). I really want the mobile (above) - it's very similar to what I was coveting in this DwellStudio picture (below) in one of my first posts on mini meez. Perfect for hanging over baby's cot or dressing up a corner of your living room.


One example of where to hang the mobile!

Also available for purchase is the treasure box (below). Aren't they great? Kits come with everything you need to make it - instructions, fabric etc, and cost $25 each.

The treasure boxes would make great bonbonnaire at weddings

Just another reason why I love this Aussie brand! And yet another thing from them to add to my great gifts list! Check out their blog for other great DIY ideas and pretty things.

Tuesday, 15 July 2008

weekend project: heart cushion


How great does this look? Wish this was my version! Mine is below... From Design*Sponge

On the subject of ripping people off... I saw this before/after on design*sponge on Friday and had to have it. All of it actually - I think I'll cover my nanna's chairs a blue like this. But in the meantime, I just copied the cushion. As best I could.


My heart cushion - I painted it freehand. Pretty good shape me thinks!

This started out as a stencilled "Amor Vincit Omnia" which is Latin for "Love conquers all" but the so-called fabric paint I used (which turned out to be a dye and not very useful) bled with my very dodgy stencil (a paper print out of the words I cut out with a ruler and razor blade!) and so I just painted the heart over it with acrylic paint. I ended up trying the text again with the acrylic and it turned out beautifully - I just haven't turned it into a cushion yet, so stay tuned...

Wednesday, 9 July 2008

how to... wallpaper a dresser


The wallpapered dresser in Layla's end of our room

I've had a few people ask me how I did this. I originally didn't post as there was a possibility it'd go in the magazine. It still might, but I can give you rough instructions! It wasn't hard - the trickiest part is probably getting the wallpaper samples. I was lucky enough to have access to scraps through work, but I did use my own as well. I was originally going to wallpaper the wall this dresser is against but the hubby didn't like my choices and I couldn't be bothered to look anymore so we painted it! So I put the samples I did have to good use on my dresser. Try wallpaper places for samples - you might have to pay a tiny fee, or if you can't seem to find any, try using pretty paper instead.

Step 1 Take off any handles and remove drawers. My father-in-law taught me a little trick with drawers: if it's an old piece of furniture, it's likely the drawers only fit in one space properly. Instead of trial and error, take out the top drawer and write "1" on the underside, then "2" on the second one etc. Then you'll know where they go when it's time to put them back!

Step 2 Paint or stain the cupboard frame if you wish. I painted mine a glossy white.

Step 3 Arrange the wallpaper samples on the floor in a pattern you'd like to replicate on the drawer front. You might need to cut some up to spread them around, just don't cut to fit just yet - a little overhang of the drawers shape is ideal. A mix of colours and patterns can look good - just don't go too crazy with a rainbow of colours. A palette of three or four main colours and a few accents always looks best.

Step 4 Use a cutting mat or chopping board, stanley knife and ruler to cut one neat edge of the wallpaper. This is the piece that will be joined to another on the drawer. Paint the back of the wallpaper with wallpaper paste (or just a good glue if you're using paper) and stick the piece as far along the drawer as you desire.

Step 5 Firmly press the paper over the drawer, smoothing out any lumps. A word of warning: no matter how well you do this, it might dry a tiny bit warped. Well it did for me anyway - I have a few wrinkles. Let's call them character lines!


A cloce-up: bumps and all!

Step 6 Repeat with the second piece of paper, only this time make the neat line on the other side so they line up nicely on the drawer.

Step 7 Turn the drawer over and place on the cutting mat or board. Use your stanley knife or razor blade to cut off the excess paper - the drawer edge should be a sufficient ruler and ensure you get the paper to fit perfectly.

Step 8 Repeat on all drawers. Replace handles (be careful not to tear the paper when poking through the screw - you might need to use a sharp needle to piece it first and then wiggle the screw through.

Step 9 Done and wait for the compliments! hah

If anyone does this themselves, let me know - would love to see your version!
Bx

Thursday, 26 June 2008

easy project: customised plywood letter

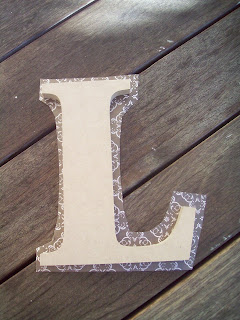
"L" is for Layla. And because I can do girlie things now I have a daughter, I cut out a few pretty pink paper butterflies and stuck them on the wall.

With my new addition to the family, I of course had to add her initial to the wall somewhere as everyone else in the house has one! But even I'm bored with the usual white or plywood letters out there, so thought I'd jazz it up a little with some paper. And being the nice person I am, I thought I'd go all Martha on you and show you step-by-step how to do it. However, it's so easy and pretty self-explanatory so I must apologise for making you feel five years old!


Your toolkit: letter, $4 and paper 80c, craft store. Spray glue, $8, hardware. Also required: newspaper

Step 1: Place the plywood letter on top of the paper right-side up and cut roughly around the shape of the letter, leaving a margin of around a centimetre. You don't have to do this, but it does make it easier to work with and also if you're tight like me, you can keep the leftover paper for other projects!

Step 2: Turn over paper cut out, pop onto newspaper and spray glue adhesive all over. Follow the instructions on the can, but it'll usually tell you to wait until it's a bit tacky before sticking

Step 3: Apply to the front of the letter and press firmly all over so the glue sticks nicely

Step 4: Turn letter over, hold firmly with one hand and use the other to cut the excess paper off. Use the letter itself like you would a ruler to cut it perfectly around the shape

Step 5: Hang wherever you like!

For more customised-letters ideas that don't actually involve you doing anything harder than spelling a name for someone else to create, check these out here. Don't you love how I keep sending you between the two blogs? How very sneaky of me!